| Home | Links | Comments | About | Contact |
|---|
Starter Spring Winder and Installer Reassembles springs in top-mounted manual rewind starters — 20 thru 30; 40 thru 70. |
 |
Reassembly of Starter
Wear safety glasses while disassembling and reassembling manual starters because of tension retained in rewind spring.
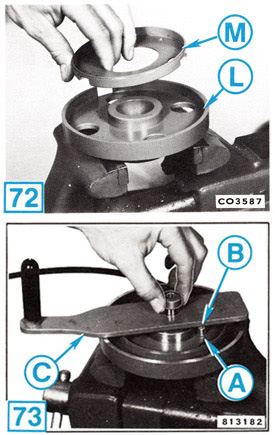
[72]
1. Using OMC Special Tool P/N 392093 (Starter Spring Winder and Installer), clamp (L) spring winder base in a vise. Insert adapter release plate (M) into spring winder base.[73] 2. Apply OMC Triple-Guard Grease or Lubriplate 777 to the rewind spring. Place inner loop of rewind spring (A) in the spring winder base. Insert the pin (B) of the crank and pin assembly (C) into the inner loop of the rewind spring. Secure the crank and pin assembly to the starter winder base with the crank retainer screw. |
 |
[74]
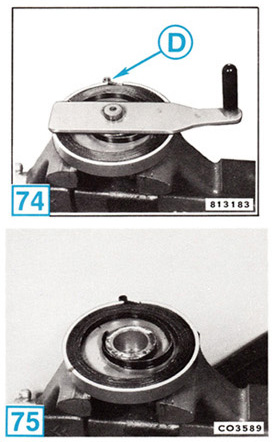
3. Rotate the crank and pin assembly in the direction shown on the tool. Wind the spring into the starter winder base until end of rewind spring (D) contacts the starter winder base.[75] 4. Remove the crank retainer screw and the crank and pin assembly from the starter winder base. 5. Remove the adapter release plate with the rewind spring from the starter winder base. |
 |
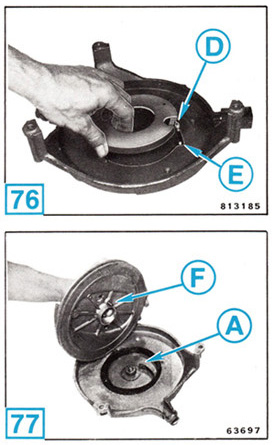
[76]
6. Install the rewind spring into the starter housing. Locate the outer loop (D) of the rewind spring on the pin (E) in the starter housing. Press down through the holes of the adapter release plate to transfer the rewind spring into the starter housing.[77] 7. Bend the inside loop (A) of the rewind spring in toward the center of the starter housing. Engage the pin (F) of the pulley with the inner loop of the rewind spring and install the pulley in the starter housing. |
 |
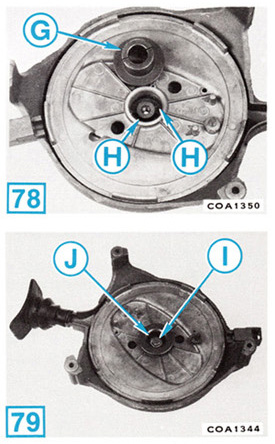
[78]
8. Apply a light coat of OMC Triple-Guard Grease or Lubriplate 777 to the spindle. Align the slots of the spindle (G) with the bosses of the starter housing and place the spindle into the pulley.[79] 9. Clean threads of the spindle retaining screw and nut to remove adhesive. Install the spindle retaining screw (I) and washer (J) into the starter housing. Tighten screw to a torque of 14-16 N•m (10-12 ft. lbs.). Spray threads of spindle retaining screw that protrude through the starter housing and threads of the nut with OMC Locquic Primer. Apply OMC Screw Lock to the threads of the nut. Install and tighten the nut securely. |
 |
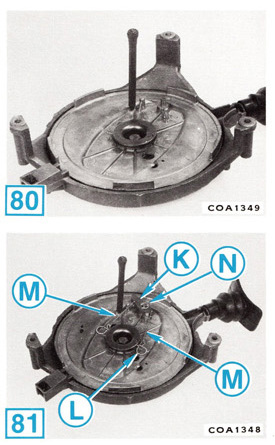
[80]
10. With the starter housing upside down on a bench, wind the pulley counterclockwise until the rewind spring is tight. Back-off the rewind spring about 1/2 to 1 turn and align hole in the pulley with hole in the starter housing. Lock pulley in position by inserting a nail, pin or drill through holes in pulley and starter housing.[81] 11. Apply a light coat of OMC Triple-Guard Grease to the pawl pin on the pulley. Install the pawl (K) with spring (L) and links (M) . Secure pawl with retaining pin (N). |
 |
[82]
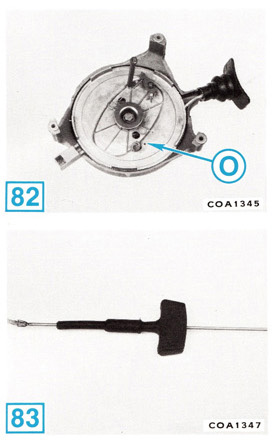
12. If necessary, tie a knot in one end of the starter rope. Thread the starter rope through the hole in the pulley and outlet of the starter housing. When installing, place the starter rope between the inside edge of the pulley and the pin (O) in the pulley.[83] 13. Apply OMC Triple-Guard Grease or Lubriplate 777 to the handle end of the starter rope. Using OMC Special Tool P/N 378774 (Starter Rope Threading Tool), thread the starter rope through the handle. Press the starter rope into the channel of the rope anchor, with end of starter rope butting firmly against end of channel. Press the anchor into the handle. Tug on end of starter rope to seat the knot against the pulley. Remove locking pin and allow the starter rope to wind slowly onto the pulley. |
 |