September, 1976 |
SB-#1429 |
SUBJECT: Mid-Range Improvement
ON MODELS: 1976 - 70 and 75 H.P.
Some of the '76 Johnson 3 cylinder motors have developed a flat spot or hesitation, and in some severe cases, a tendency to die during mid-range acceleration such as when pulling up skiers. If blipping the choke momentarily helps the motor accelerate thru the mid-range R.P.M., a lean carburetion condition is indicated and the mid-range performance may be improved by making the carburetor modifications or carburetor exchange detailed below.
In all cases, if unsatisfactory performance is reported, you should first:
Check to see that no propeller ventilation is occurring during acceleration. If ventilation is present, change motor position as required.
Check to see that the motor is running at the maximum operating R.P.M. at wide open throttle (W.O.T.) with one person on board (5500 R.P.M. for 70 h.p. and 5800 R.P.M. for 75 h.p.). Change propeller to get this R.P.M.
Check to see that the motor timing and synchronization are properly adjusted.
This includes:
1. Full spark advance setting (17° for 70 and 16° for 75 h.p.)
2. Throttle linkage synchronization (all throttle valves closed, back-lash out of linkage with roller off cam).
3. Throttle cam adjustment (embossed throttle cam mark on roller center-line at pick-up point, that is when throttle shafts start to rotate).
4. Throttle cam - spark advance synchronization (Throttle cam pick-up at top dead center, T.D.C. - adjust yoke on throttle rod to set).
If there is no ventilation, motor is at maximum operating R.P.M..rat W.O.T., motor is CORRECTLY timed and synchronized, and motor appears to be running lean during mid-range acceleration, the carburetors may either be modified or replaced. Details of either approach are listed below.
I. CARBURETOR MODIFICATION
The carburetors may be modified as detailed below and a warranty allowance request filed for 3.0 hours labor, total, including testing and material replacement or credit voucher for the following:
3 - Core Plug P/N 306442
3 - Idle Orifice P/N 320016
4 - Clamp Strap P/N 320107
3 - Carburetor Gasket P/N 314477
If you wish to modify the carburetors:
1. Remove air silencer, linkage and fuel lines from carburetors and remove carburetors.
2. Remove float bowl and float.
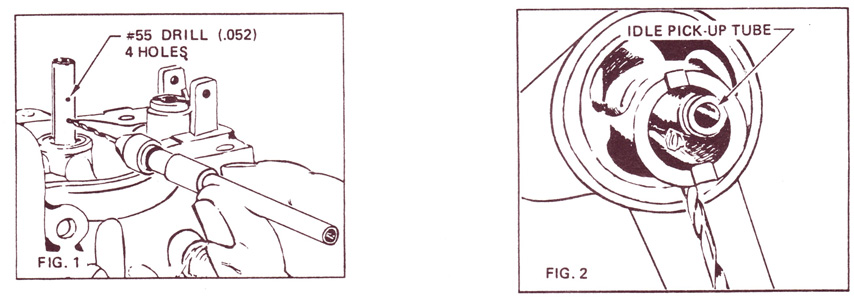
3. Use a #55 (.052) drill in a pin vise to ream out the four holes in the high-speed nozzle. Drill only far enough to go thru the nozzle wall, without damaging the idle pick-up tube inside. See figures 1 and 2. DO NOT use any other number size, letter size, or fractional size drills except those recommended for these or any of the other drilled holes in this modification. DO NOT use an electric drill. If a pin vise is not available, wrap tape around the drill shank to increase shank size for a better grip. Drill all holes straight thru carefully. Egg shaped holes will result in improper calibration. Remove any burrs inside nozzle. Do not bend the pick-up tube inside the high-speed nozzle from its off-center position.
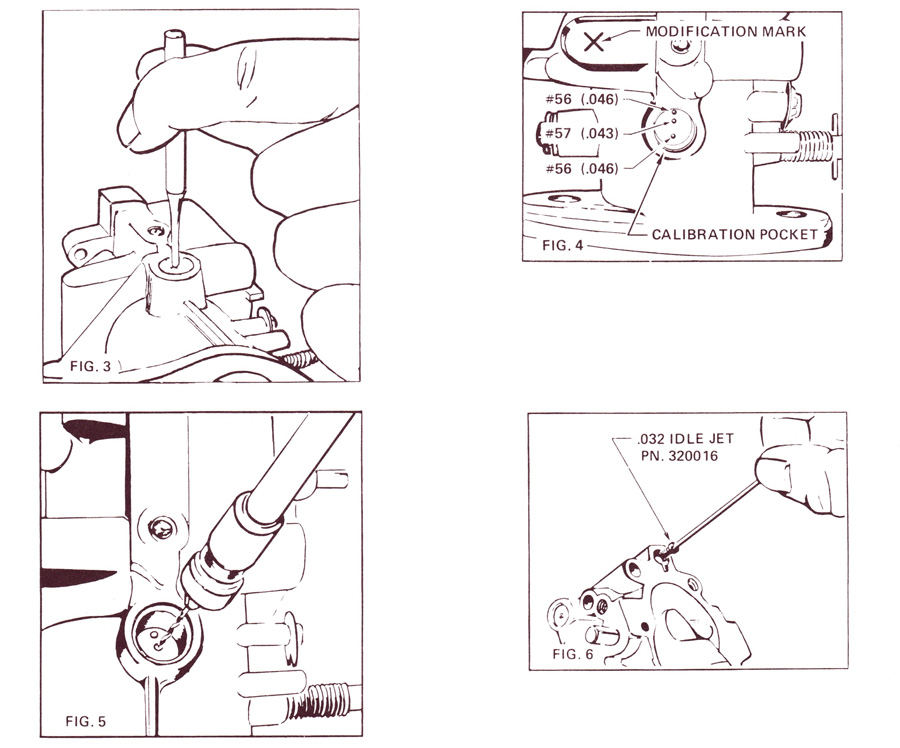
4. Drive a 1/8 inch pin punch just thru the core plug covering the calibration pocket and pry out the plug. See Figure 3.
5. Use a #56 (.046) drill to enlarge the two outer calibration ports and a #57 (.043) drill to enlarge the center port. See Figures 4 and 5. Observe all of the precautions stated above.
6. Remove the .030 idle orifice, shake and blow out any drill chips, and install the .032 idle orifice P/N 320016. See Figure 6.
7. Apply a VERY SMALL amount of the OMC Adhesive M very carefully to the outer edge of the new core plug and install, flattening with a punch. Seal plug with Adhesive M.
8. Use a metal stamp or chisel to mark the top of the carburetor with an "X" and reassemble the carburetor. See Figure 4. Repeat the modifications on other two carburetors. After carburetors are installed spray orange paint on the port side of the carburetors for quick future identification.
II. CARBURETOR REPLACEMENT
If you prefer to install re-calibrated carburetors that are available on an exchange basis, you may submit a warranty claim to Johnson Outboards Service Department for 2.5 hours labor, total, including testing, and the 70 h.p. or 75 h.p. re-calbrated carburetors and associated parts listed below. You will be charged for the carburetors until the old ones have been returned to Johnson Outboards Service Department. The components required for the carburetor exchange are:
70 H.P. Exchange Components:
1 - Middle Carburetor P/N 387904
2 - Upper and Lower Carburetor P/N 387905
4 - Clamp Strap P/N 320107
3 - Carburetor Gasket P/N 31447775 H.P. Exchange Components:
1 - Middle Carburetor P/N 387906
2 - Upper and Lower Carburetor P/N 387907
4 - Clamp Strap P/N 320107
3 - Carburetor Gasket P/N 314477
Whether modifying or exchanging carburetors, next install carburetors, using the old throttle adjustment levers and screws carefully synchronize the throttle and choke linkage, check the throttle cam adjustment and the throttle cam - spark advance synchronization as detailed above and in service manual. Test motor before delivery to customer.
 |
DJL/kr
| NOTE: | The 70 and 75 h.p. carburetors that are shipped from the Johnson Outboards Service Department will be painted stinger orange on the port side. When servicing the orange marked carburetors or those with the "X" on the top be sure that only .032 idle orifices are used. |
| NOTE: | Post on your 70 and 75 h.p. index under heading "Carburetion". |