October 1965. Johnson Motors Service Bulletin SB-1070 explains removal and installation of the press-fit distributor cam used on V4A(L)-17 and V4ML-12 series engines, including the required distributor shaft nut torque.
SUBJECT: REMOVAL & INSTALLATION OF PRESS FIT DISTRIBUTOR CAM
ON MODELS: a) V4A(L)-17 THRU
b) V4ML-12 THRU
Please be advised that the distributor cam used on the subject engines is now a press fit on the distributor shaft. Therefore, the following procedure should be carefully followed so as to avoid breakage of the cam during removal or installation:
I. TO REMOVE THE PRESS FIT CAM:
- With the distributor cap removed, remove the rotor by pulling it straight up.
- Remove the breaker plate.
- Slip a 3/4" box end wrench over the cam onto the hex nut and back this nut off 1-1/4 turns. DO NOT EXCEED THIS FIGURE - damage to the cam, distributor shaft key and/or keyway may result.
- Now, run the 3/4" hex nut back down on the distributor shaft. This will leave a space between the bottom of the cam and the top of the 3/4" hex nut.
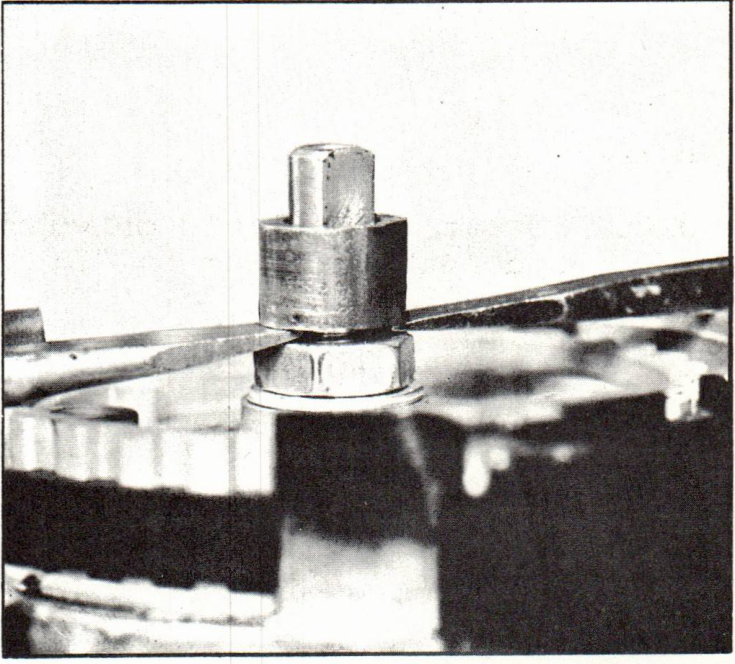
- Using two screw drivers, as shown in Figure 1, pry the cam upward. The cam will come off with little effort.
- AFTER THE DISTRIBUTOR CAM HAS BEEN REMOVED, RETORQUE THE 3/4" HEX NUT TO 18-22 FT. LBS.
II. TO INSTALL A NEW CAM OR REINSTALL AN OLD ONE
- Being sure that the "Top" side of the cam is up, line up the keyway in the cam with the key in the distributor shaft as closely as possible.
- Place a 1/2" deep well socket on top of the cam and gently tap it down until the cam is in place, against the hex nut.
BE SURE THAT THE DISTRIBUTOR SHAFT KEY DOES NOT SLIP OUT OF PLACE DURING THIS OPERATION.
N. Peter Hansen
Administrative Assistant
NPH:rs
NOTE: Post this bulletin on your V4-80 HP and VM-100 HP Indexes under the heading of "Ignition".