SB-1296 - Proper Mounting of Engine
Issued June 1972, this Johnson Service Bulletin explains correct installation of 1972 50 H.P. outboards using transom mounting kit 384189. The two original factory pages are reproduced below with searchable installation instructions and three original mounting diagrams.

PART NO. 384189
To install transom mounting kit and secure engine to boat, proceed as follows:
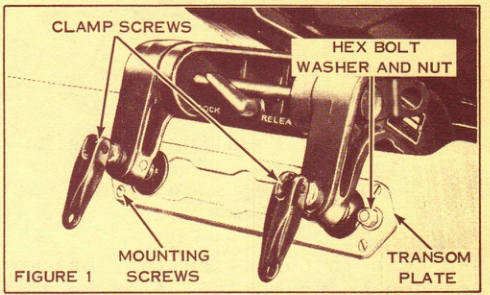
1. Center the motor on transom. Place transom plate between clamp screws and transom and tighten clamp screws. Attach transom plate using 4 screws provided in kit. See figure 1.
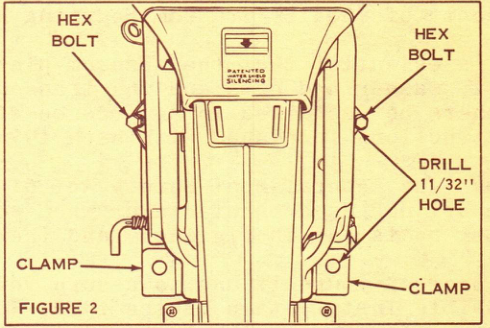
2. Tilt motor up and lock in this position. Insert transom clamps in slots at bottom of each stern bracket. See figure 2.
3. Drill four 11/32" holes through transom using transom clamp and stern bracket holes as guides. See figure 2.
4. Use a good waterproof caulking compound between clamps and transom to make installation water tight.
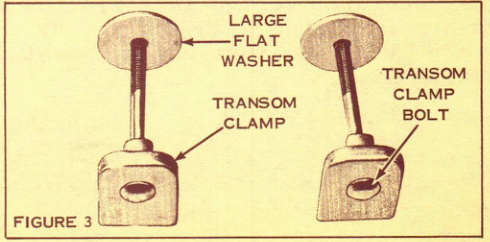
5. Install clamps using the two transom clamp bolts supplied. Secure with two nuts and large flat washers inboard of transom.
DO NOT SUBSTITUTE BOLTS OF UNKNOWN QUALITY FOR TRANSOM CLAMP BOLTS SUPPLIED WITH ENGINE.
6. Insert hex head bolts through stern bracket holes and attach washers and nuts on transom plate. See figure 1.
7. Unlock motor and tilt down. After 30 minutes of operation, retighten clamp screws by hand. DO NOT use tools.
Historical note: The bulletin emphasizes using all supplied mounting hardware and warns against substituting unverified bolts. Follow the original factory illustrations and verify suitability with current marine safety standards before performing repairs.