SB-1468 - Adjusting Indicator Gauge on Integral Power Tilt & Trim
Issued July 1978, this Johnson Service Bulletin provides a seven-step procedure for adjusting the integral power tilt and trim indicator gauge, with original factory photographs of the thrust rod and sending unit.

SB-1468
July, 1978
SUBJECT: ADJUSTING INDICATOR GAUGE ON INTEGRAL POWER TILT & TRIM
To insure that the Tilt-Trim Indicator gauge corresponds to the motor position, complete the following steps:
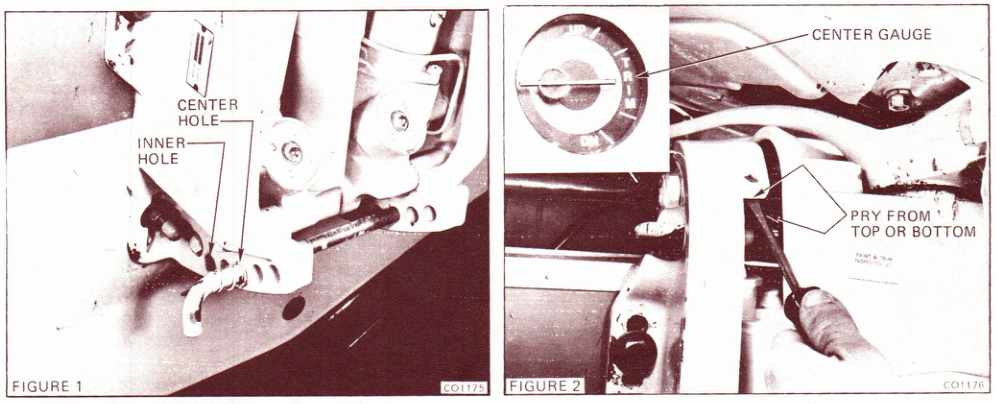
- Raise the motor to the full tilt position and move thrust rod to the center hole after noting original position. See Figure 1.
- Loosen the two sending unit attaching screws just enough to allow the unit to be moved with moderate pressure.
- Lower the motor until it is tight against the thrust rod.
- Turn the ignition switch to the “ON” position and if the gauge does not register center, then move the sending unit by prying against it with a screwdriver from the top or bottom until it does. See Figure 2.
- Tilt the motor up and tighten the two sending unit attaching screws.
- Lower the motor against the thrust rod and recheck the gauge reading and readjust if necessary.
- Raise the motor off of the thrust rod and reposition rod to the innermost hole. See Figure 1.
NOTE: Post on 85 thru V-6 indexes under heading “Lower Unit.”