Electric OutboardsNo. 2068
February, 1983
Subject:Recommended Battery Installation Procedure
Models:Electric Trolling Motor, 12 and 24 Volt Models
We recommend that separate batteries be provided for the electric trolling motor and the outboard motor. Using a common battery source for both motors may allow the electric trolling motor to discharge the battery to the point where the outboard motor cannot be started.
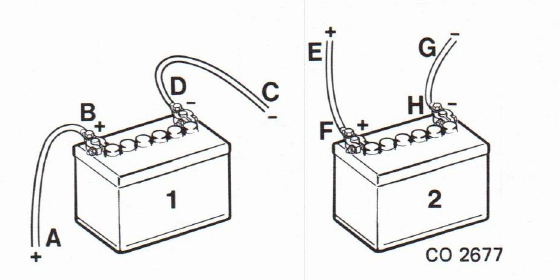
A. 12 Volt Model, using two separate batteries
- Connect red lead (A) of electric trolling motor to + terminal (B) of battery No. 1.
- Connect black lead (C) of 12V electric trolling motor to - terminal (D) of battery No. 1.
- Connect red lead (E) of outboard motor to + terminal (F) of battery No. 2.
- Connect black lead (G) of outboard motor to - terminal (H) of battery No. 2.
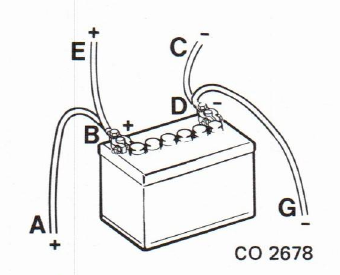
B. 12 Volt Model, using one battery
- Connect red lead (A) of 12V electric trolling motor to + terminal (B) of battery.
- Connect black lead (C) of 12V electric trolling motor to - terminal (D) of battery.
- Connect red lead (E) of outboard motor to + terminal (B) of battery.
- Connect black lead (G) of outboard motor to - terminal (D) of battery.
(Continued)
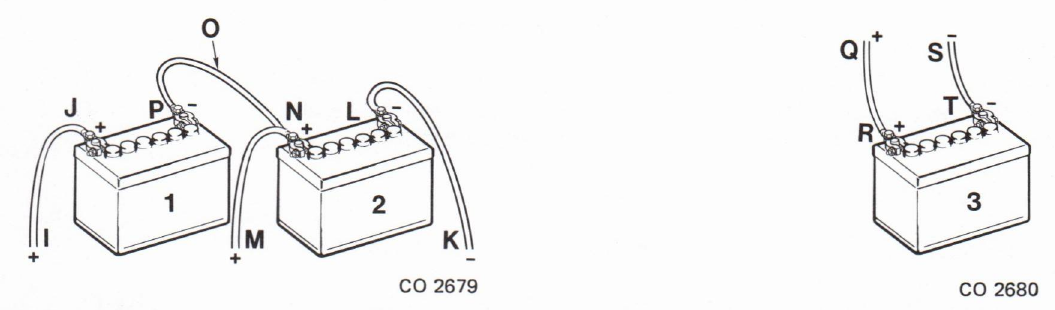
C. 12-24 Volt Model, using three batteries. (Two for 12-24 volt electric trolling motor and one for the outboard.)
- Connect jumper lead (O) to - terminal (P) of No. 1 battery. Connect other end of jumper lead (O) to + terminal (N) of No. 2 battery.
- Connect black lead (K) of 12-24V electric trolling motor to - terminal (L) of battery No. 2.
- Connect white lead (M) of 12-24V electric trolling motor to + terminal (N) of battery No. 2.
- Connect red lead (I) of 12-24V electric trolling motor to + terminal (J) of battery No. 1.
- Connect red lead (Q) of outboard motor to + terminal (R) of No. 3 battery.
- Connect black lead (S) of outboard motor to - terminal (T) of No. 3 battery.
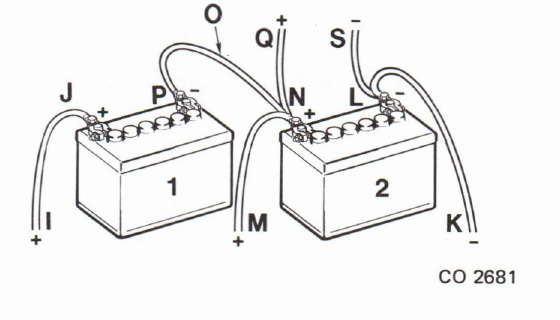
D. 12-24 Volt Model, using two batteries. (Two for 12-24 volt electric trolling motor and one of the two batteries for the outboard motor.)
- Connect jumper lead (O) to - terminal (P) of No. 1 battery. Connect other end of jumper lead (O) to + terminal (N) of No. 2 battery.
- Connect black lead (K) of 12-24V electric trolling motor to - terminal (L) of battery No. 2.
- Connect white lead (M) of 12-24V electric trolling motor to + terminal (N) of battery No. 2.
- Connect red lead (I) of 12-24V electric trolling motor to + terminal (J) of battery No. 1.
- Connect red lead (Q) of outboard motor to + terminal (N) of No. 2 battery.
- Connect black lead (S) of outboard motor to - terminal (L) of No. 2 battery.
Note If the outboard motor were connected to the positive and negative terminals of the first battery, there would be a 12 volt potential difference between the electric motor’s ground and the outboard’s ground. This difference will cause stray current corrosion or electrolysis to the outboard’s lower unit.